
Plugins may be the most important feature of WordPress. Plugins let you add all kinds of features to your site in seconds. However, sometimes you may not find a plugin that meets your needs, or don’t want additional features existing plugin offers, or you may simply want to write your own plugin.
You may want to create a WordPress plugin to include small functions that you need to customize your site. It’ll make sure you get exactly what you want and it’ll also decrease conflicts many plugins can make. That’s why it’s a good idea to make your own plugin regardless of who you are!
Today we’ll learn to develop a simple WordPress plugin that adds a custom HTML class to your website’s body element. Let’s help you to develop your first WordPress plugin!
How to Create a WordPress Plugin?
Creating a WordPress plugin is a lot easier than you think! In fact, you can create a plugin with just a few lines of code with very little prior knowledge or experience.
Like WordPress, a WordPress plugin must be written on PHP scripting language to make it work. First, create a file with PHP extension in your PC, let’s say it’s my-first-plugin.php, and open the file in a text editor, and then add the PHP declaration text into the file:
<?php
Please don’t put anything (no space!) before "<?php" because it can break your site.
Add some plugin information after the PHP declaration and put them between /* and */ characters. There are specific tags to declare specific plugin information. Here’s some plugin information:
/*
Plugin Name: My First Plugin
Plugin URI:  https://bydik.com/
Description: Plugin to add custom body class to my site.
Version:     1.0
Author:      Faisal Kabir
License:     GNU General Public License v2 or later
*/
You can change the information whatever you like but you can’t change the wording of the tags, it’ll not work. For example, changing "Author" to "Plugin Author" will not work.
The "Plugin Name" tag is the only compulsory tag for a WordPress plugin to work, all other information tags are optional. All plugin information tags with descriptions can be found here.
You can add your custom functions to the file now. Before adding custom functions to the file, it’s always recommended to make sure the file can’t be accessed directly. Here’s the code for this:
if ( ! defined( 'ABSPATH' ) ) die();Let’s add the necessary function to add a custom class to the body element of your site, let’s add “my-plugin-loaded” class to the body! You’ll need this code for this:
add_filter( 'body_class', 'my_custom_body_class' );
function my_custom_body_class( $class ) {
    $class[] = 'my-plugin-loaded';
    return $class;
}
The few lines of code will add the body class we wanted! You can change the class name in this code "my-plugin-loaded" to whatever you want, easier than you thought!
Final Code: Let’s collect all the codes we’ve discussed so far. Here’s everything we’ve got:
<?php
/*
Plugin Name: My First Plugin
Plugin URI:  https://bydik.com/
Description: Plugin to add custom body class to my site.
Version:     1.0
Author:      Faisal Kabir
License:     GNU General Public License v2 or later
*/
// No direct access
if ( ! defined( 'ABSPATH' ) ) die();

// Custom body class for my site
add_filter( 'body_class', 'my_custom_body_class' );
function my_custom_body_class( $class ) {
    $class[] = 'my-plugin-loaded';
    return $class;
}
Save the plugin file to install it on your WordPress site. Let’s install your first WordPress plugin!
How to Install a Custom Plugin File?
Installing a WordPress plugin is very easy, it doesn’t matter if you have access to the FTP server or not! It’s time to learn how to install the plugin file we just created.
If you’ve access to your FTP server, open the plugins folder (wp-content/plugins) of your site, and then create a custom folder with a unique name on it. If you’re using FTP clients like FileZilla, just right-click on “plugins” and then select “Create directory” from the options to create a folder.


Now upload the plugin file we created before inside the new folder. If done with the upload, your first plugin installation is complete.
No FTP access? You can easily install a plugin via the WordPress dashboard.
To install a plugin via WordPress dashboard, you need to put the plugin file in a custom folder of your PC, and then compress the folder containing the plugin file in .zip format. After doing this, you can upload and install the plugin from your WordPress dashboard.
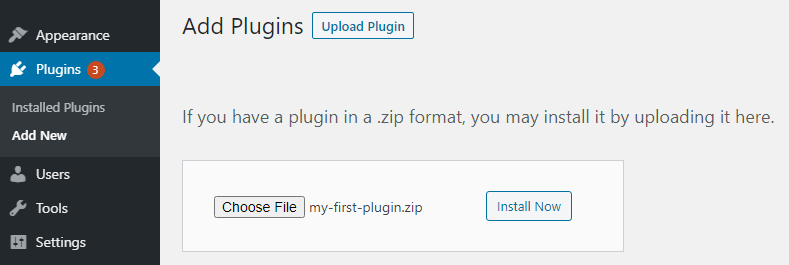
Go to Plugins > Add New, click on “Upload Plugin”, click on “Choose File” to locate the .zip compressed plugin file, and then finally click on “Install Now” to install the plugin.

Plugin Activation: After installing the plugin, the plugin can be found in the plugins page of your WordPress dashboard and you’ll see all the plugin information you provided during the development of it. The plugin is now ready for activation, click on “Activate” to make it work.


After activating the plugin, check your website’s body class to see if “my-plugin-loaded” class is added or not. On our test, the plugin worked as expected and added the body class:


If your experiment has the same output, you are a plugin developer now! Congratulations to you and welcome to the developer’s world! You’ve learned how to create and install a WordPress plugin and it’ll make you more comfortable using WordPress in the coming days.
You can add more functions to the plugin file to customize your site as you like. Don’t feel shy to increase your skill level in managing and fixing your WordPress site, there are plenty of resources to work with. Who knows, you can be an author of complex plugins like Jetpack in the future!
Final Thoughts
You can’t imagine a WordPress site without having a plugin, business sites have tens of plugins. Due to the open-source nature of WordPress, anybody can add new functionality to the platform. Why shouldn’t you? The best way to get started is by creating your own WordPress Plugin.
It’s very easy to create and install a plugin in WordPress. To sum up, create a PHP file with PHP declaration, add some necessary plugin information, and then add some functions to the file. You can install the plugin file easily by putting it into a folder on your WordPress plugins folder.
That’s it! We can have the necessary discussions in the comment section. Have a nice day!
Never wanted to create a WordPress plugin, but just finished my first plugin, never thought it would be that easy. Thank you for this!
Glad to know that you benifited from this article.